
5 Reasons to throw your scales in the bin
Body Plot • December 15, 2020
Christmas is coming! And with all big events in our lives, the pressure is on to fit into the perfect outfit, be that number on the scale and look a certain way. Let's turn down the temperature in the pressure cooker and start focusing on the right way of cooking!
Self-weighing can be hugely unhelpful - especially for those who do struggle with emotional eating, have an eating disorder or haven't quite developed a healthy relationship with their bodies yet. So here are 5 reasons why you should throw the scale out the window, preferably in the bin, and not allow it to be a method of progress tracking.
1. Weight does not equal fat.
Most of us who are weighing ourselves are doing so to drop body fat, but then why do we use the scale? It's like using a ruler to measure the tastiness of a cake? Okay, not exactly, but you get the gist. The number on the scale doesn't weigh fat, it weighs your total body weight. This includes fat but is not limited to fat. Actually, your body weight comprises the weight of your organs, bones, muscle, and everything single thing inside your body - including food, water, and your poo! Weight is also hugely impacted by your salt intake, your hormones, your stress levels, sleep quality, and water quantity plus so much more. What does measure fat then? Measurements, progress photos, and clothes sizes - these are far more accurate than that wretched machine.
2. Weight doesn't tell us anything about our health.
You could be very much in your 'BMI' but yet be hugely unhealthy! Or you could be over your BMI and be very much healthy. Yet if we become obsessed with the scales, we often miss the very point of nutrition, lifestyle and exercise - health, not weight.
3. Weight can alter your mood.
Have you ever stepped on the scale, knowing you've been so "good' this week and then nothing shifts - oh the rage! And suddenly it sends us in a spiral of deep depression which often leads to emotional eating, mood changes and a challenging rest of your day. That weight could've gone up due to menstruation or a late meal and actually, your fat could've gone down but as you've now let your day's mood be impacted by the scale, you've eaten more calories and sugar than you otherwise would have.
4. Weight tracking can lead to obsession.
Suddenly every morsel we put in our mouths and every workout ends up being a quest to lose weight on the scale. Our obsession means that all of a sudden we end up losing the real purpose of why we eat certain things and move in certain ways. We stop exercising because we enjoy the endorphins, enjoy lifting weights, enjoy classes, or enjoy reaching our personal best on the pull-up bar. Instead, the exercise ends up being a means to an end, a way just to change the number. What a waste of an opportunity - what a waste of life! Everything we say, eat, drink, and do is an incredible experience which we miss out on due to having unrealistic expectations and a scale-orientated approach. Shift your mind off the scale and do things you love. You'll feel the difference both in your physical body and within your mental health.
5. You are not an athlete.
Certain professions require weight and body fat percentages to be taken in order to qualify them in their sport. Think boxing and F1. If you are like us - two ordinary people (but pretty awesome all the same) we don't need to know how much we weigh nor our body fat percentage to operate or live. We desperately try to reach a number because we heard about this thing called the BMI or our friend who looks like us is 'x weight' and once we reach it, we obsess to stay there. Ask yourself, will my life change if I am 2 kgs heavier or lighter? Chances are, it won't. You'll feel the same. Except, by removing the need to know your weight, you'll feel free, happy, and lighter - in both the physical and mental sense!
You are more than a number.
You have an amazing personality and so much to give to the world. Every day is a blessing and an opportunity to live your best life. Don't get bogged down by the scale! You are worth more than this. So today we urge you to ditch your scales. And if you have kids? Ditch if faster. Don't let them develop the poor relationships with food that so many of us adults encounter. Appreciate the beauty that is your body. Eat for good health, move because your body can and inspire your loved ones to do the same. And just like that, watch your mind, body and soul go from content, to now happy, wild and free.
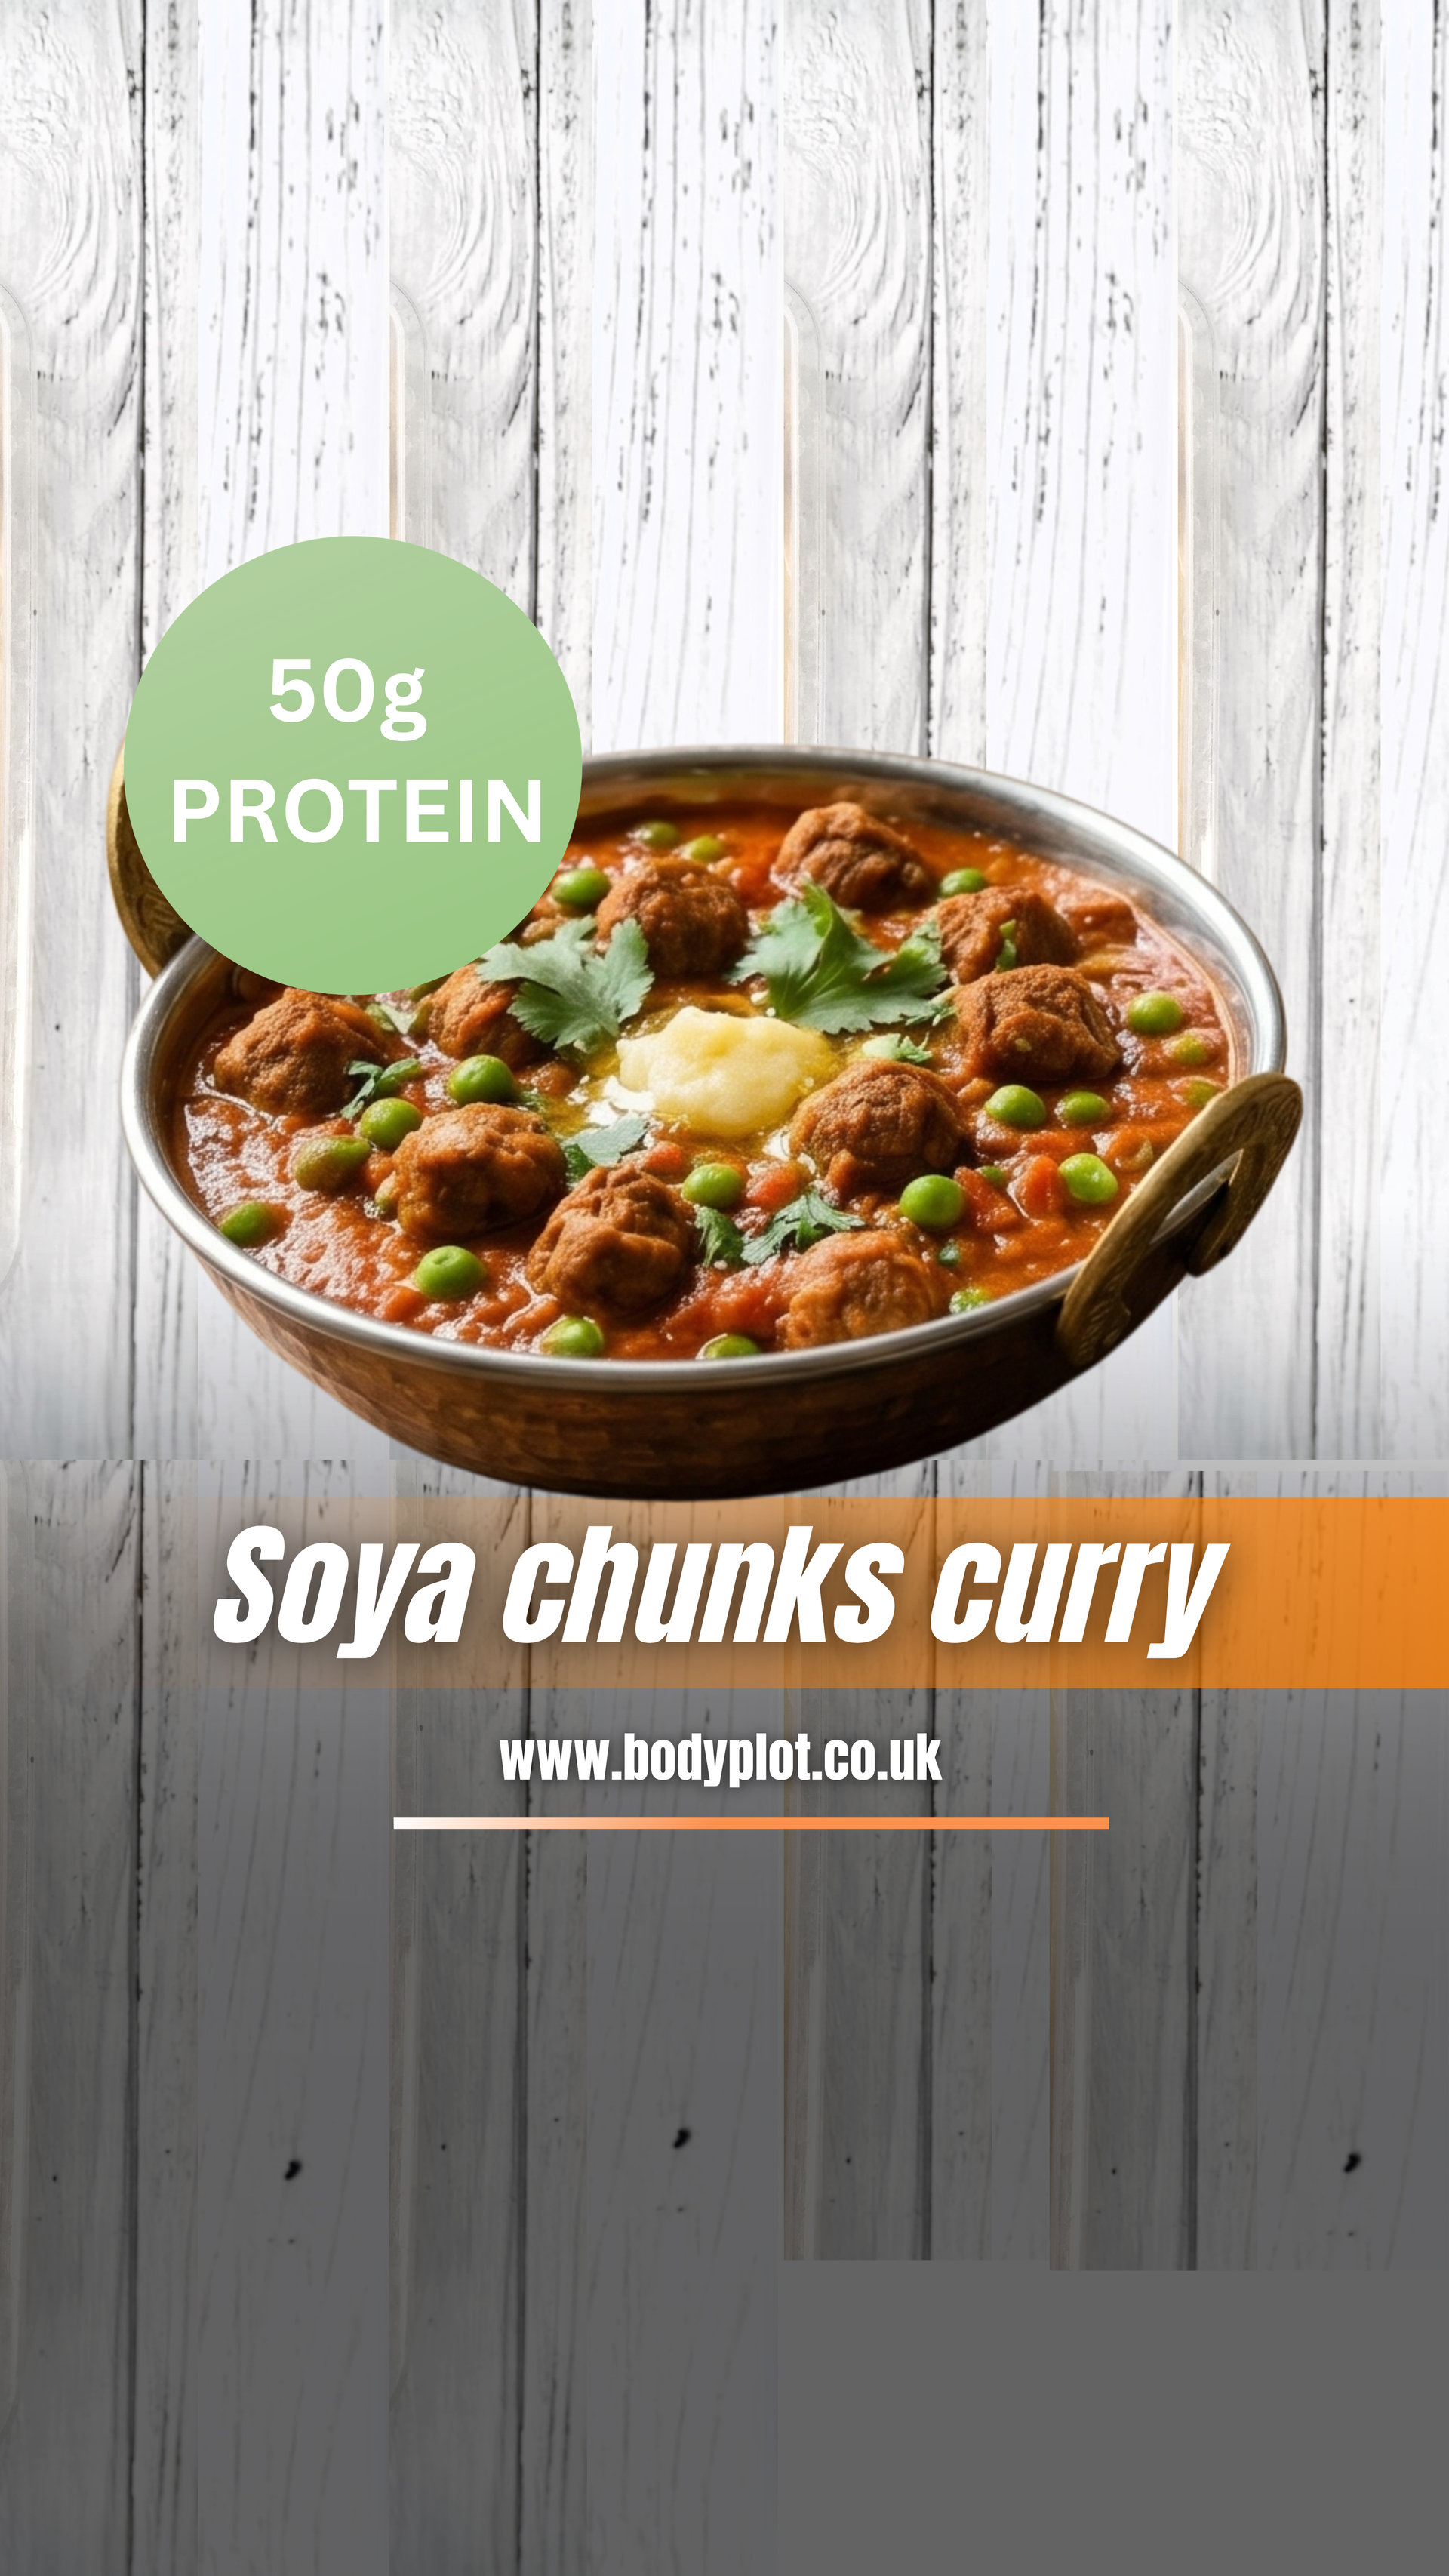
SOYA CHUNKS & PEAS CURRY (High Protein, Budget Friendly) Ingredients + Method Soak: 100g soya chunks in hot water for 10 minutes Squeeze out water and rinse. In a pan, heat 1 tsp oil. Add: 1 chopped onion Cook until golden. Add: 1 tbsp ginger-garlic paste Add spices: 1 tsp cumin 1 tsp garam masala 1 tsp coriander powder ½ tsp turmeric Add: 2 chopped tomatoes Cook until soft. Add: 100g frozen peas Soya chunks Add 200–300ml water and simmer for 15 minutes. Finish with: Fresh coriander Squeeze of lemon
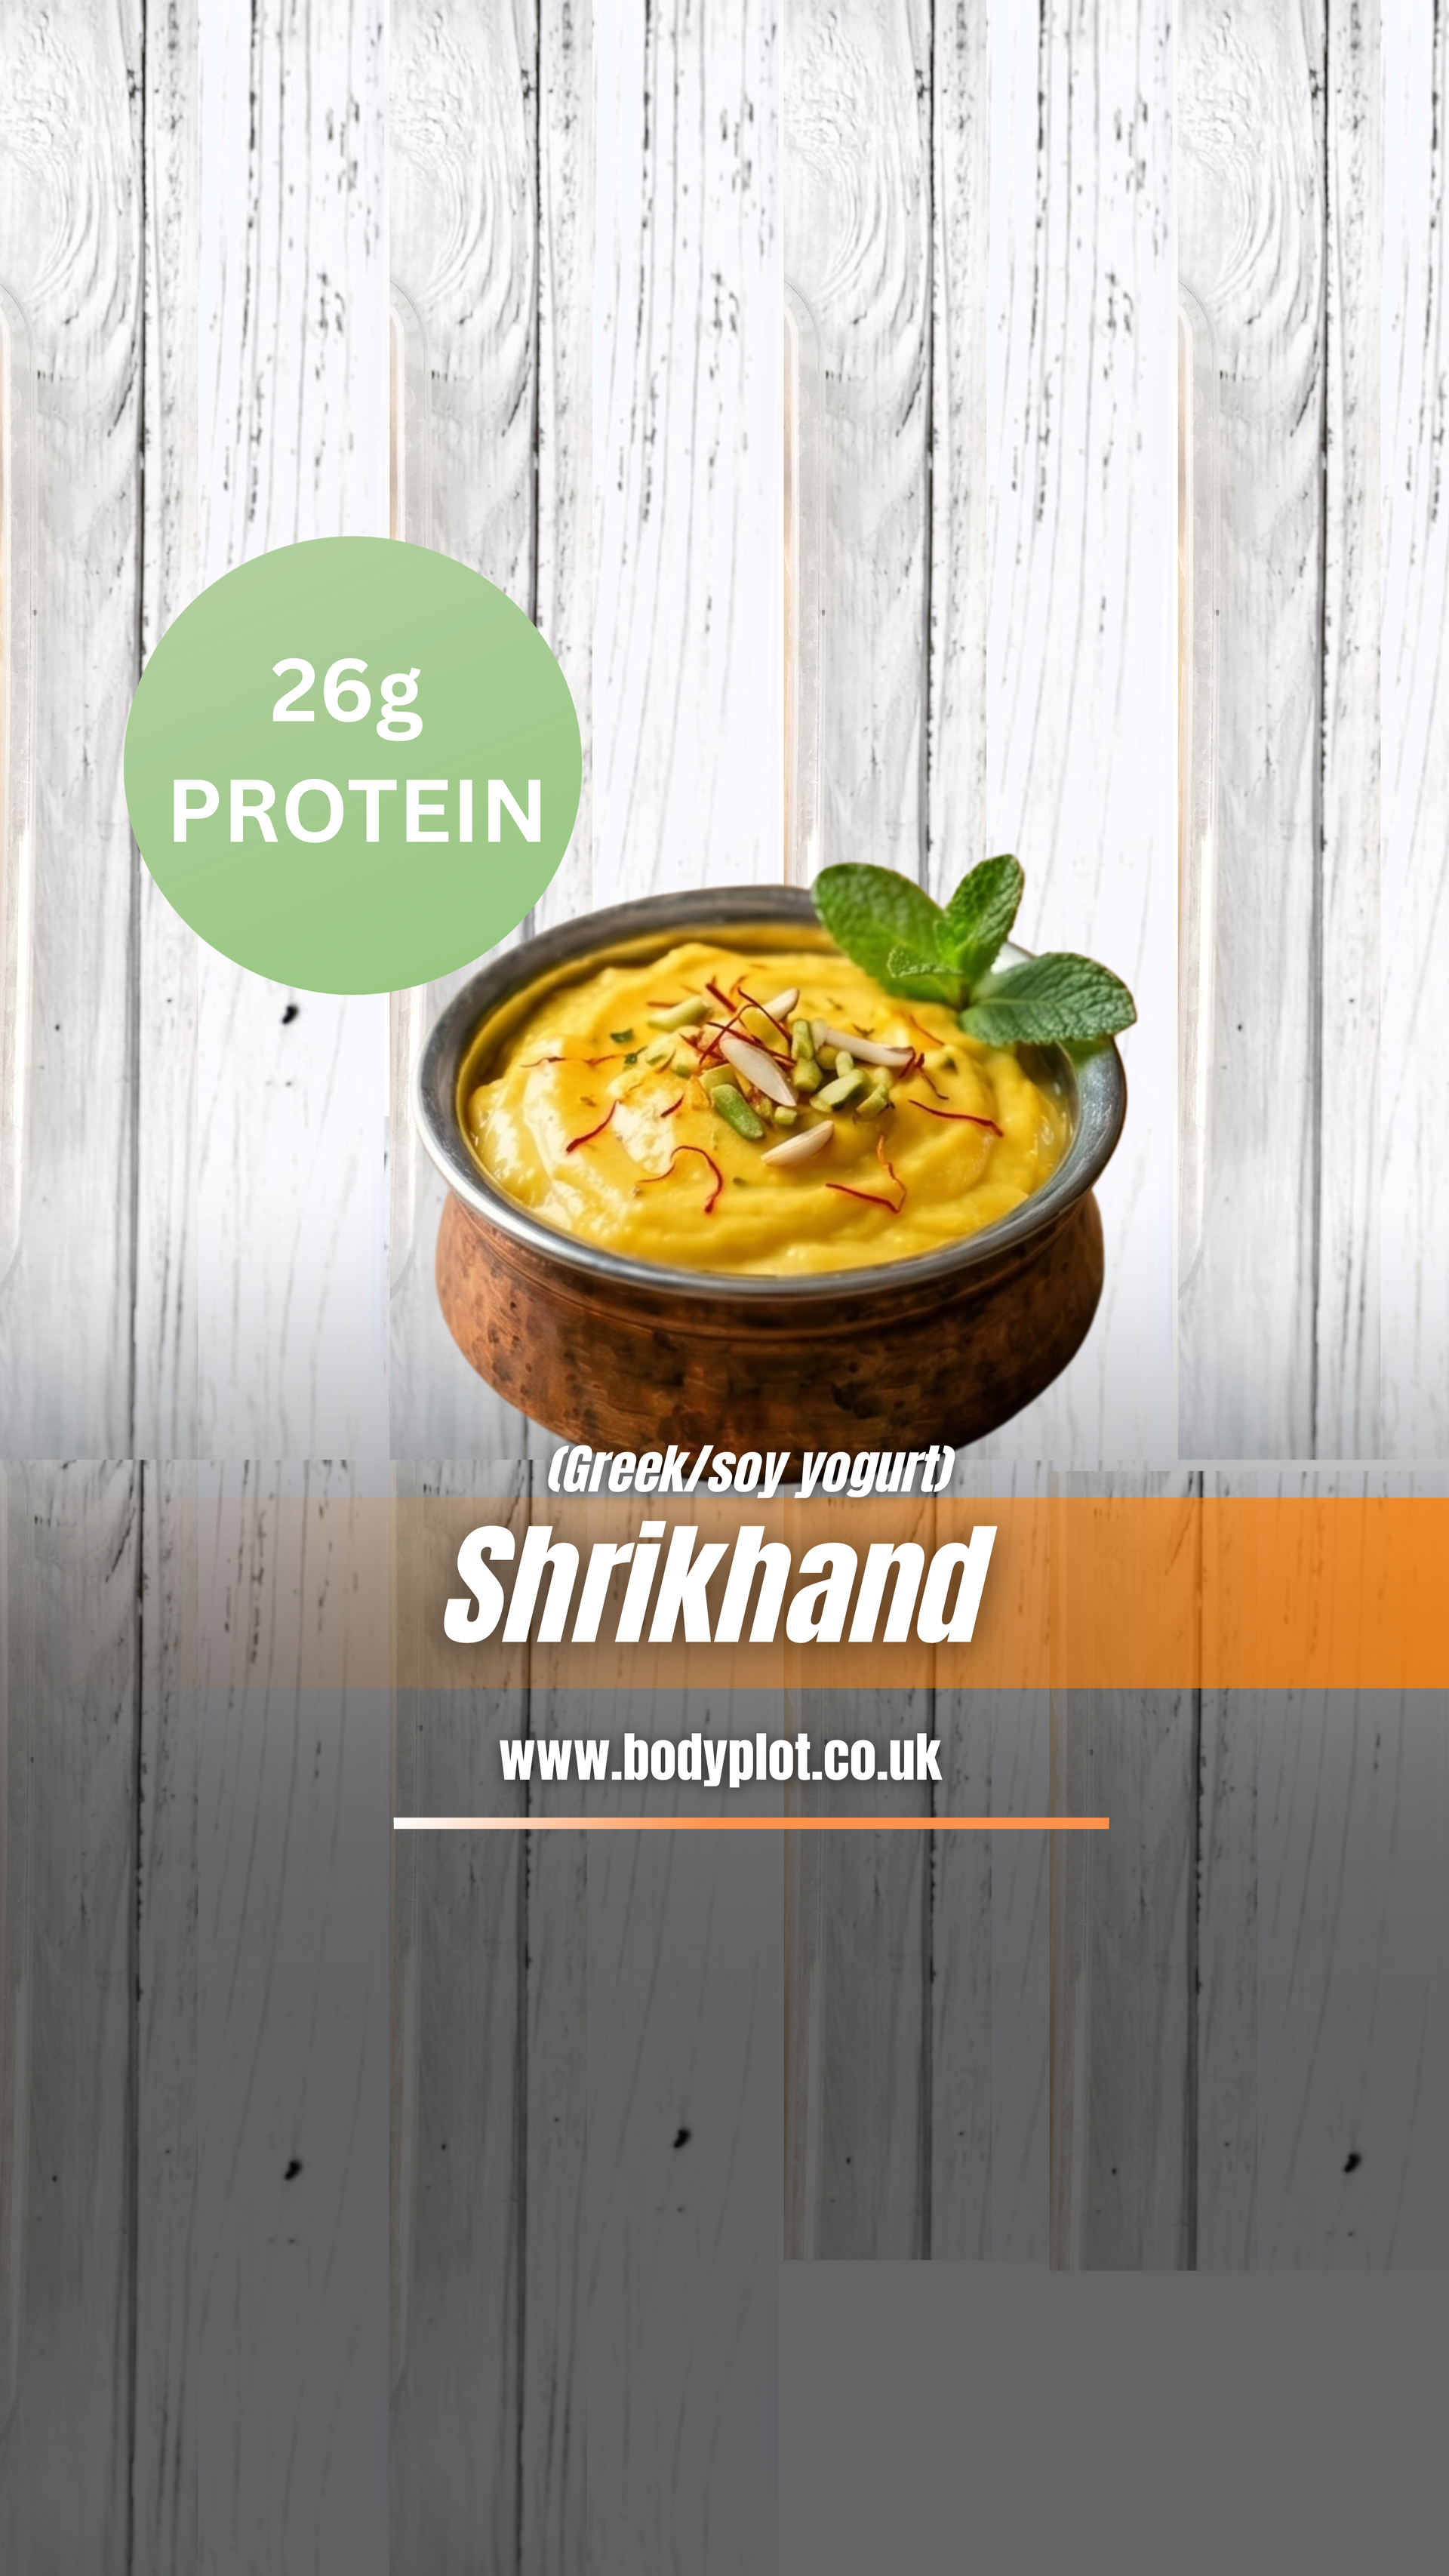
GREEK / SOYA YOGURT SHRIKHAND (High Protein Dessert) Ingredients + Method In a bowl, combine: 300g 0% Greek yogurt OR thick soya yogurt (If using regular yogurt, strain overnight for thickness) Add: 1–2 tbsp maple syrup or honey or stevia powder 1/2 tsp cardamom powder ¼ tsp cardamom powder Few strands saffron soaked in warm water Mix well until smooth. Optional toppings: Chopped pistachios Almond slivers Chill for 1 hour before serving.
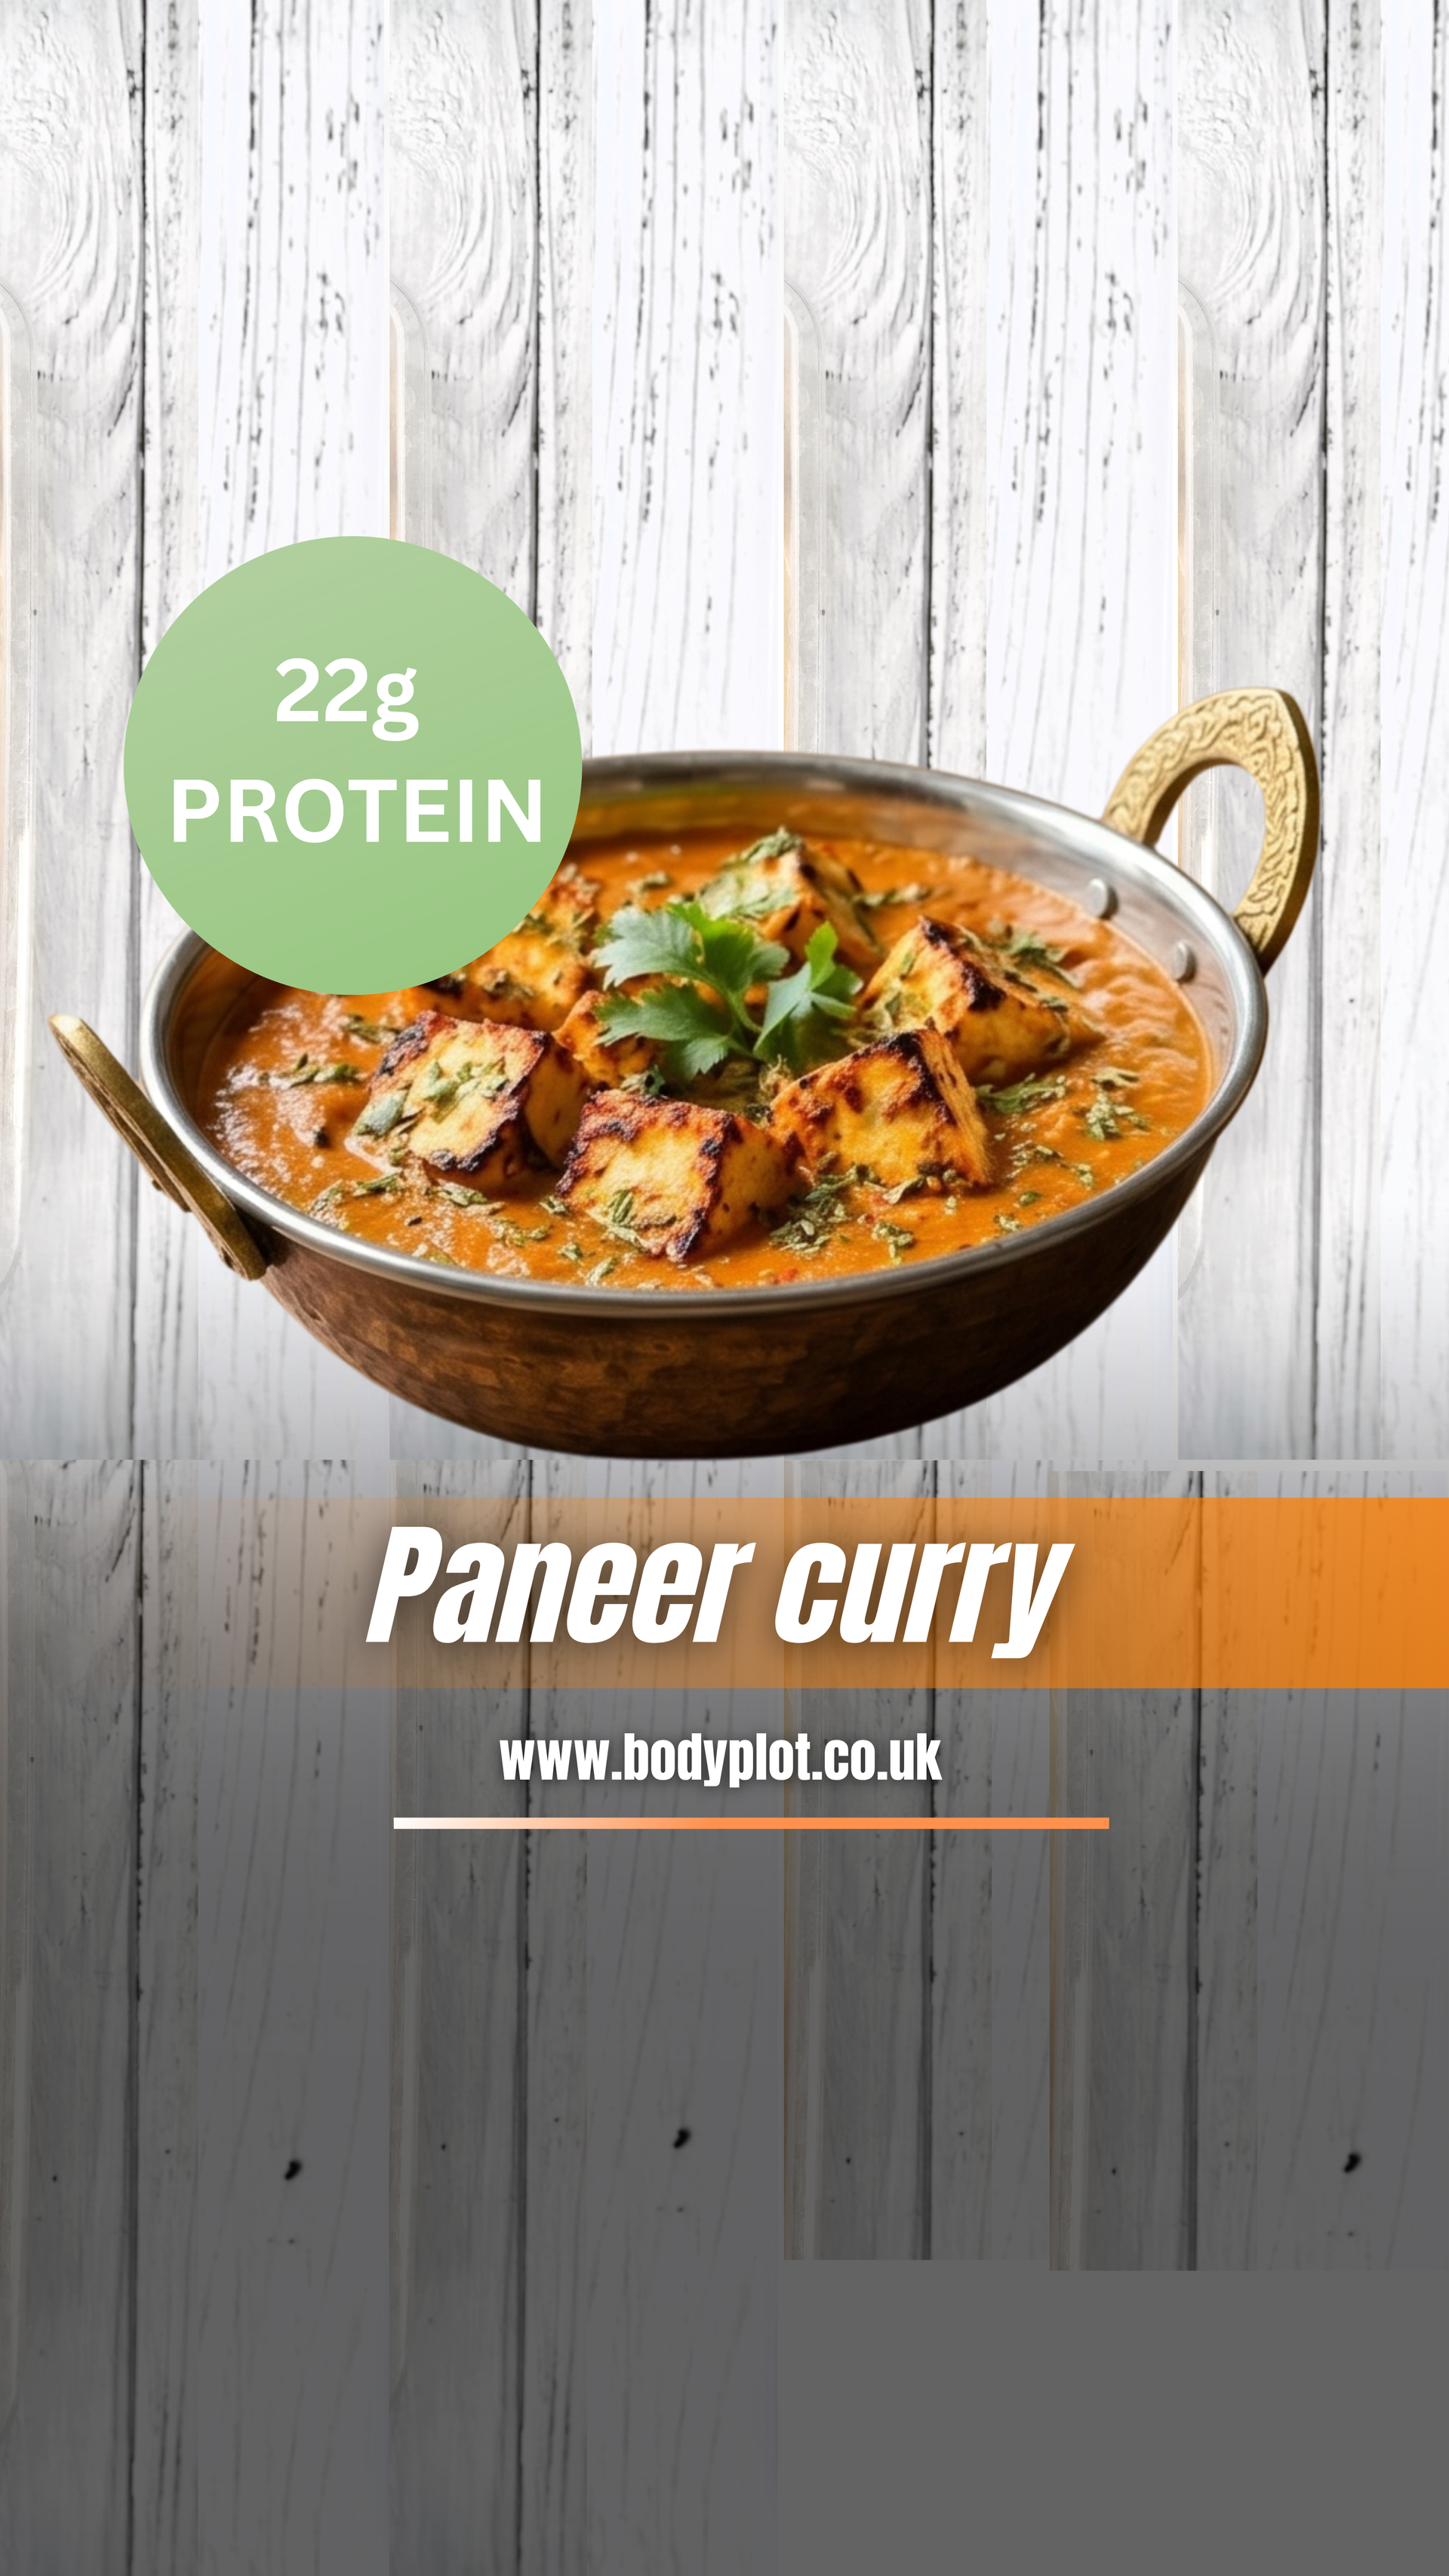
PANEER TIKKA MASALA (Lighter, High Protein Version) Ingredients + Method Cut 250g Apetina paneer into cubes. Marinate with: 3 tbsp 0% Greek yogurt or Soya yogurt 1 tsp turmeric 1 tsp garam masala 1 tsp paprika Salt Leave for at least 30 minutes. Air fry or grill at 200°C for 10–12 minutes until lightly charred. For sauce: In a pan, heat 1 tsp oil. Add: 1 chopped onion Cook until soft. Add: 2 cloves garlic 1 tbsp ginger Add spices: 1 tsp cumin 1 tsp garam masala ½ tsp turmeric Add: 1 tin chopped tomatoes Simmer 10 minutes and blend if desired. Stir in: 2 tbsp Greek or soya yogurt (off heat to avoid splitting) Add paneer and simmer gently for 5 minutes. Finish with coriander.
The body content of your post goes here. To edit this text, click on it and delete this default text and start typing your own or paste your own from a different source.

The body content of your post goes here. To edit this text, click on it and delete this default text and start typing your own or paste your own from a different source.

🌱 What You’ll Need (Ingredients): Sweet Potato Puree: 1 ½ cups (Approx. 2 medium sweet potatoes, roasted and mashed) Nut Butter: ½ cup almond or cashew butter (creamy works best) Maple Syrup: ¼ cup (or honey) Cocoa Powder: ½ cup (unsweetened, good quality) Oat Flour: 1/3 cup (or almond flour for GF) Eggs: 2 large (or substitute with 2 flax eggs for vegan!) Vanilla Extract: 1 tsp Baking Powder: 1 tsp Sea Salt: ½ tsp + extra for finishing Chocolate Chips: ½ cup (dark is delicious!) Walnuts: ¼ cup, chopped (for the topping!) Optional: A pinch of cinnamon or cardamom for that extra spring warmth! ✨ 👩🍳 How to Make the Magic (Method): Prep: Preheat your oven to 175°C. Line an 8x8 inch baking dish with parchment paper (leave overhang for easy removal!). Blend the Base: In a large bowl or food processor, combine the smooth sweet potato puree , nut butter , maple syrup , eggs (or flax eggs), and vanilla extract . Mix until perfectly smooth and creamy. Add the Dry Ingredients: Add the cocoa powder , oat flour , baking powder , and sea salt . Fold gently until just combined—don’t overmix! (The texture should be thick and dreamy). If you’re using cinnamon or cardamom, add it now. Fold in the Treats: Gently fold in most of your chocolate chips . Leave a few aside to sprinkle on top! Assemble: Pour the batter into your prepared pan and smooth the top. Sprinkle with the reserved chocolate chips, the chopped walnuts , and a generous pinch of flaky sea salt . Bake: Bake for 25–30 minutes, or until the edges are firm and the center feels set but still soft. You want them fudgy! Chill (The Secret!): This is the hardest part, but it’s crucial. Let the brownies cool completely in the pan, then refrigerate them for at least 1 hour (or overnight) before slicing. This locks in that magical, dense, fudgy texture. Serve & Celebrate: Lift the brownies out using the parchment, slice into squares, and enjoy! ✨ Perfect with a glass of milk (dairy or non-dairy!) or just as they are.
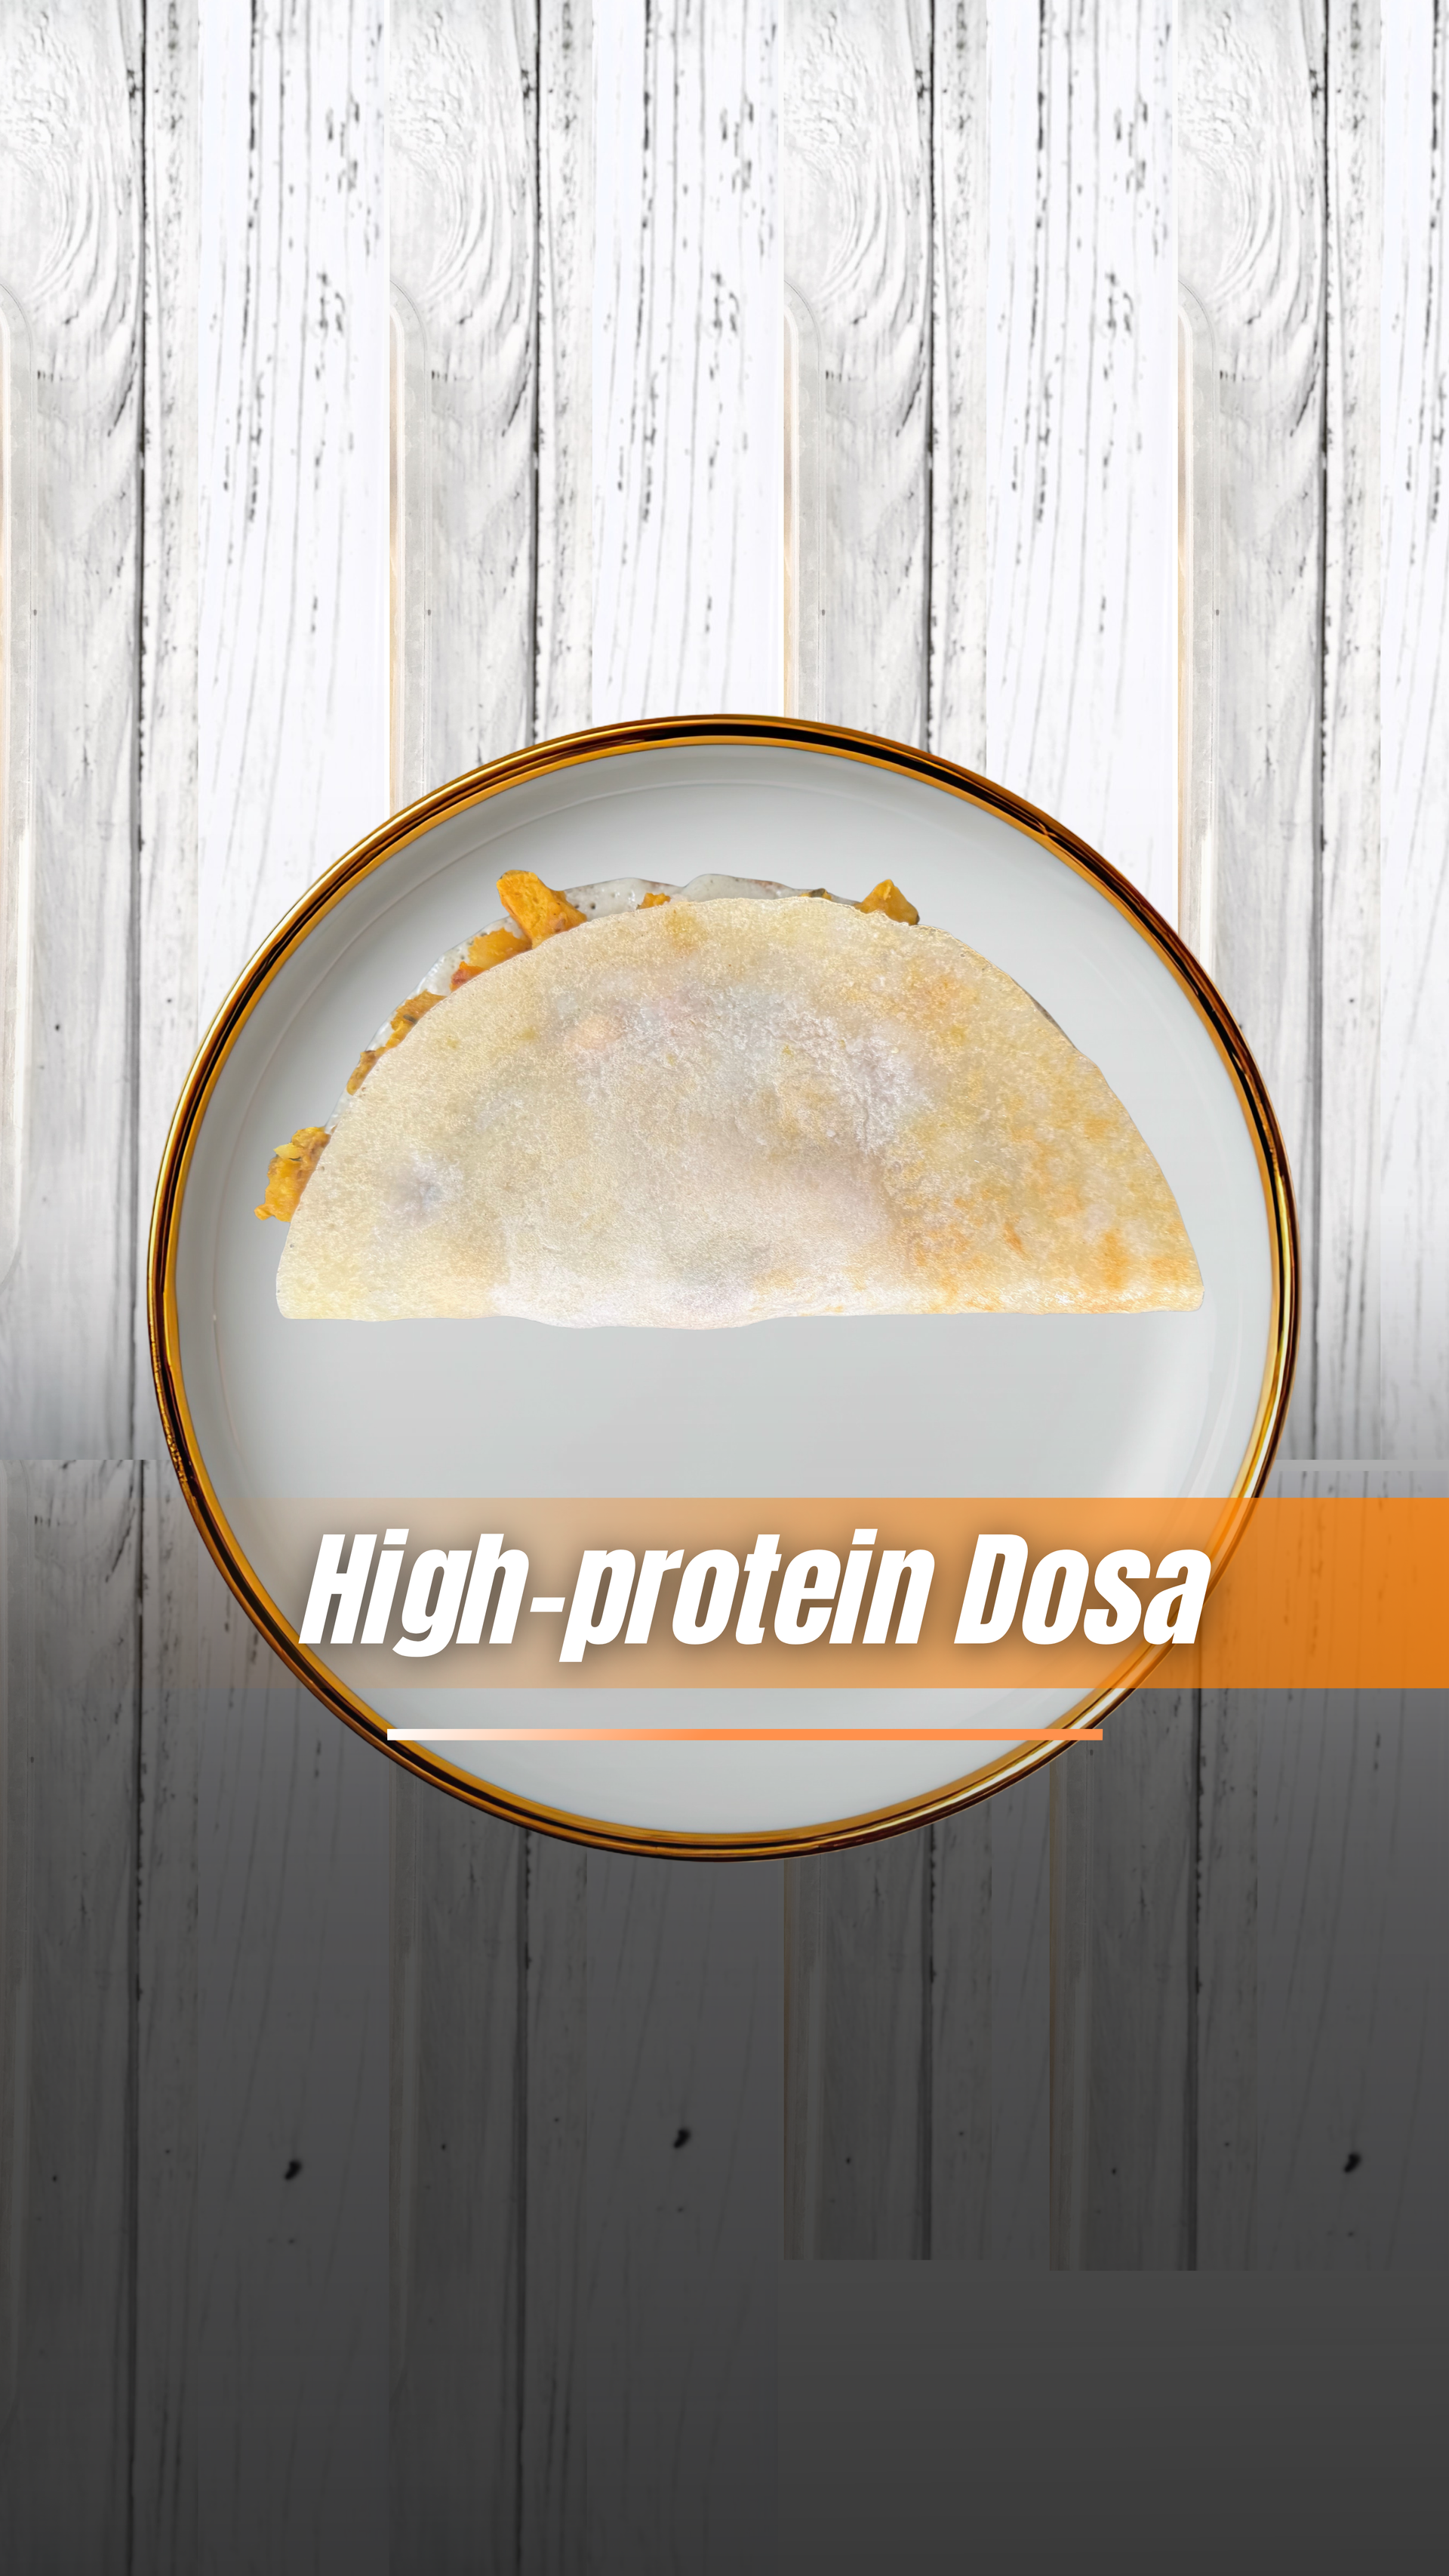
20g Protein Dosa (Paneer or Tofu Filling) A comforting South Indian favourite with a high-protein twist. If you love dosa but struggle to hit your protein targets, this version is a game changer. By combining a traditional potato masala with either paneer or tofu, each dosa delivers around 20g of protein while still tasting like the classic comfort food we all love. Perfect for breakfast, lunch or dinner when you want something satisfying, nourishing and simple to make. Serves Makes 4 high-protein dosas Protein Approx 20g protein per dosa Ingredients For the dosa batter 2 cups dosa batter (store bought or homemade with more lentils) 1 tsp oil or ghee per dosa for cooking For the high-protein masala filling 2 medium potatoes, boiled and roughly mashed 200g paneer or firm tofu, crumbled 1 small onion, finely chopped 1 tsp mustard seeds 1 tsp cumin seeds 8–10 curry leaves 1 green chilli, finely chopped (optional) ½ tsp turmeric ½ tsp chilli powder 1 tsp garam masala Salt to taste 1 tbsp oil Juice of ½ lemon Handful fresh coriander, chopped Method Prepare the filling Heat oil in a pan over medium heat. Add mustard seeds and allow them to pop. Add cumin seeds and curry leaves and sauté for 30 seconds until fragrant. Add the chopped onion and cook until soft and lightly golden. Build the masala Add turmeric, chilli powder and garam masala. Stir for 30 seconds. Add the mashed potatoes and mix well so they absorb the spices. Add the protein Stir in the crumbled paneer or tofu and mix thoroughly with the potato masala. Cook for 3–4 minutes so everything heats through. Finish with lemon juice and fresh coriander. Cook the dosa Heat a non-stick or cast-iron pan. Pour a ladle of batter and spread into a thin circle. Drizzle a little oil or ghee around the edges and cook until the bottom is golden and crisp. Assemble Place a generous scoop of the protein masala in the centre of the dosa. Fold and serve hot with chutney or sambar.
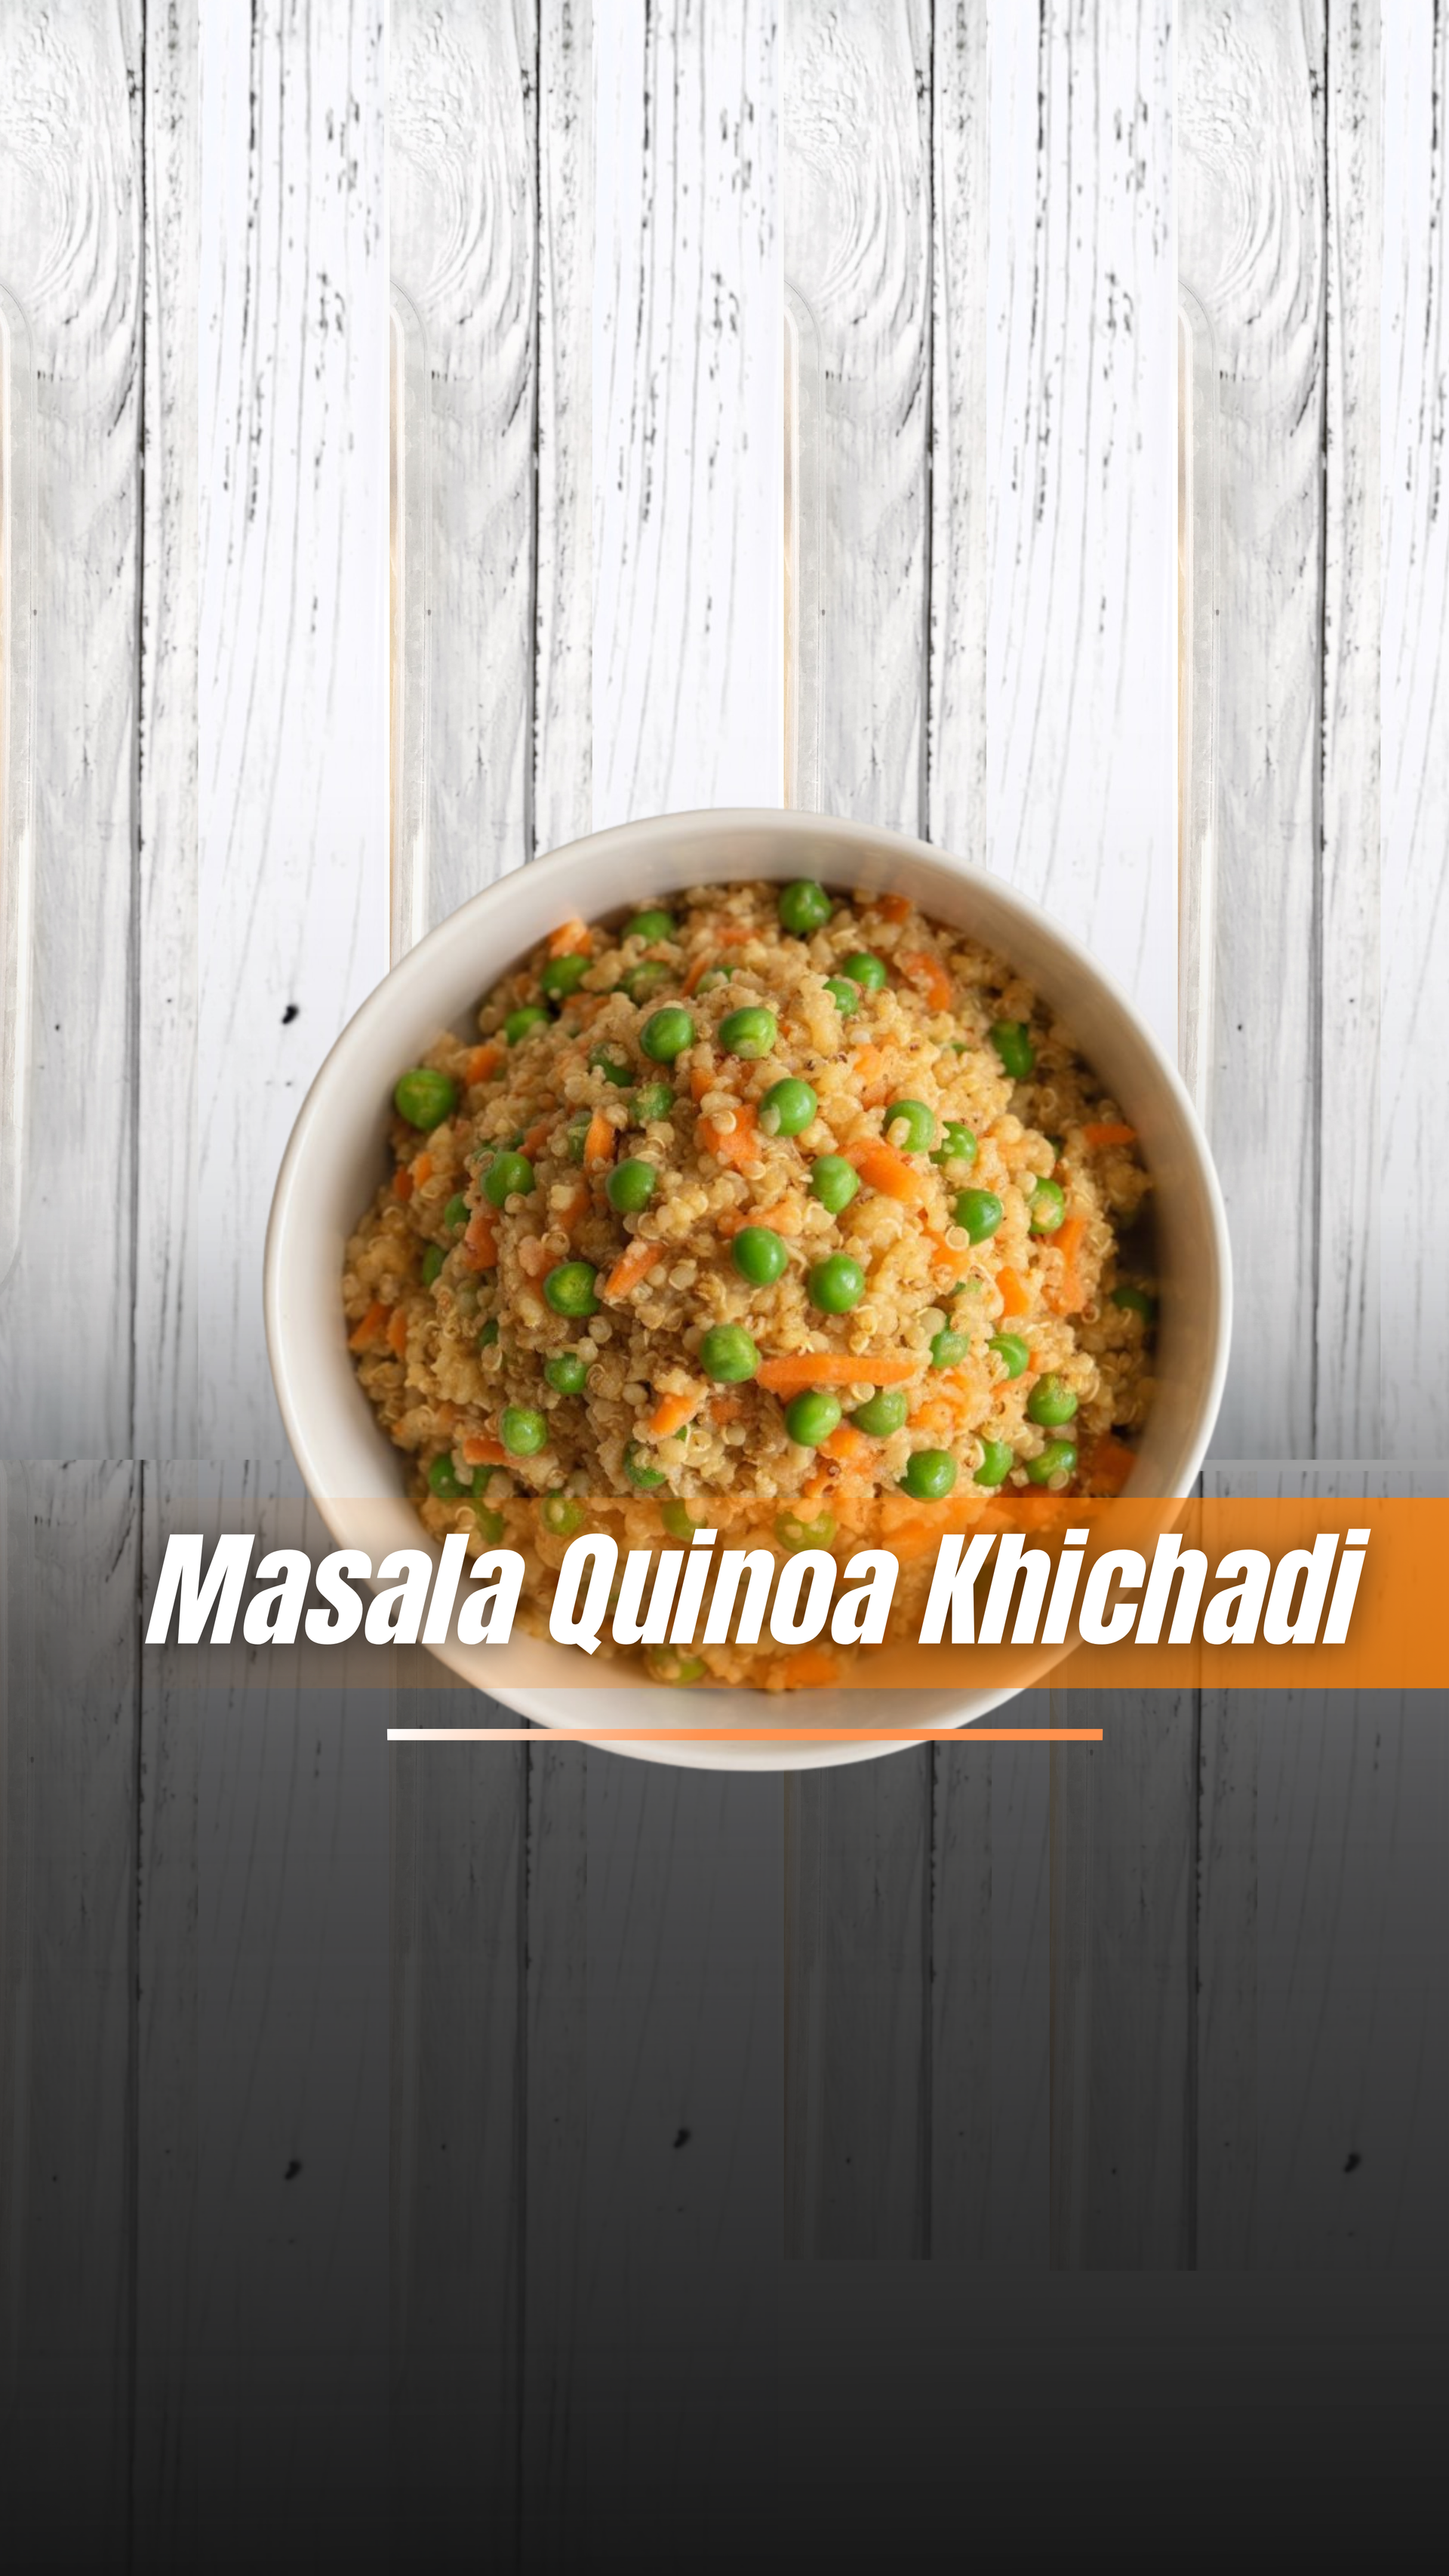
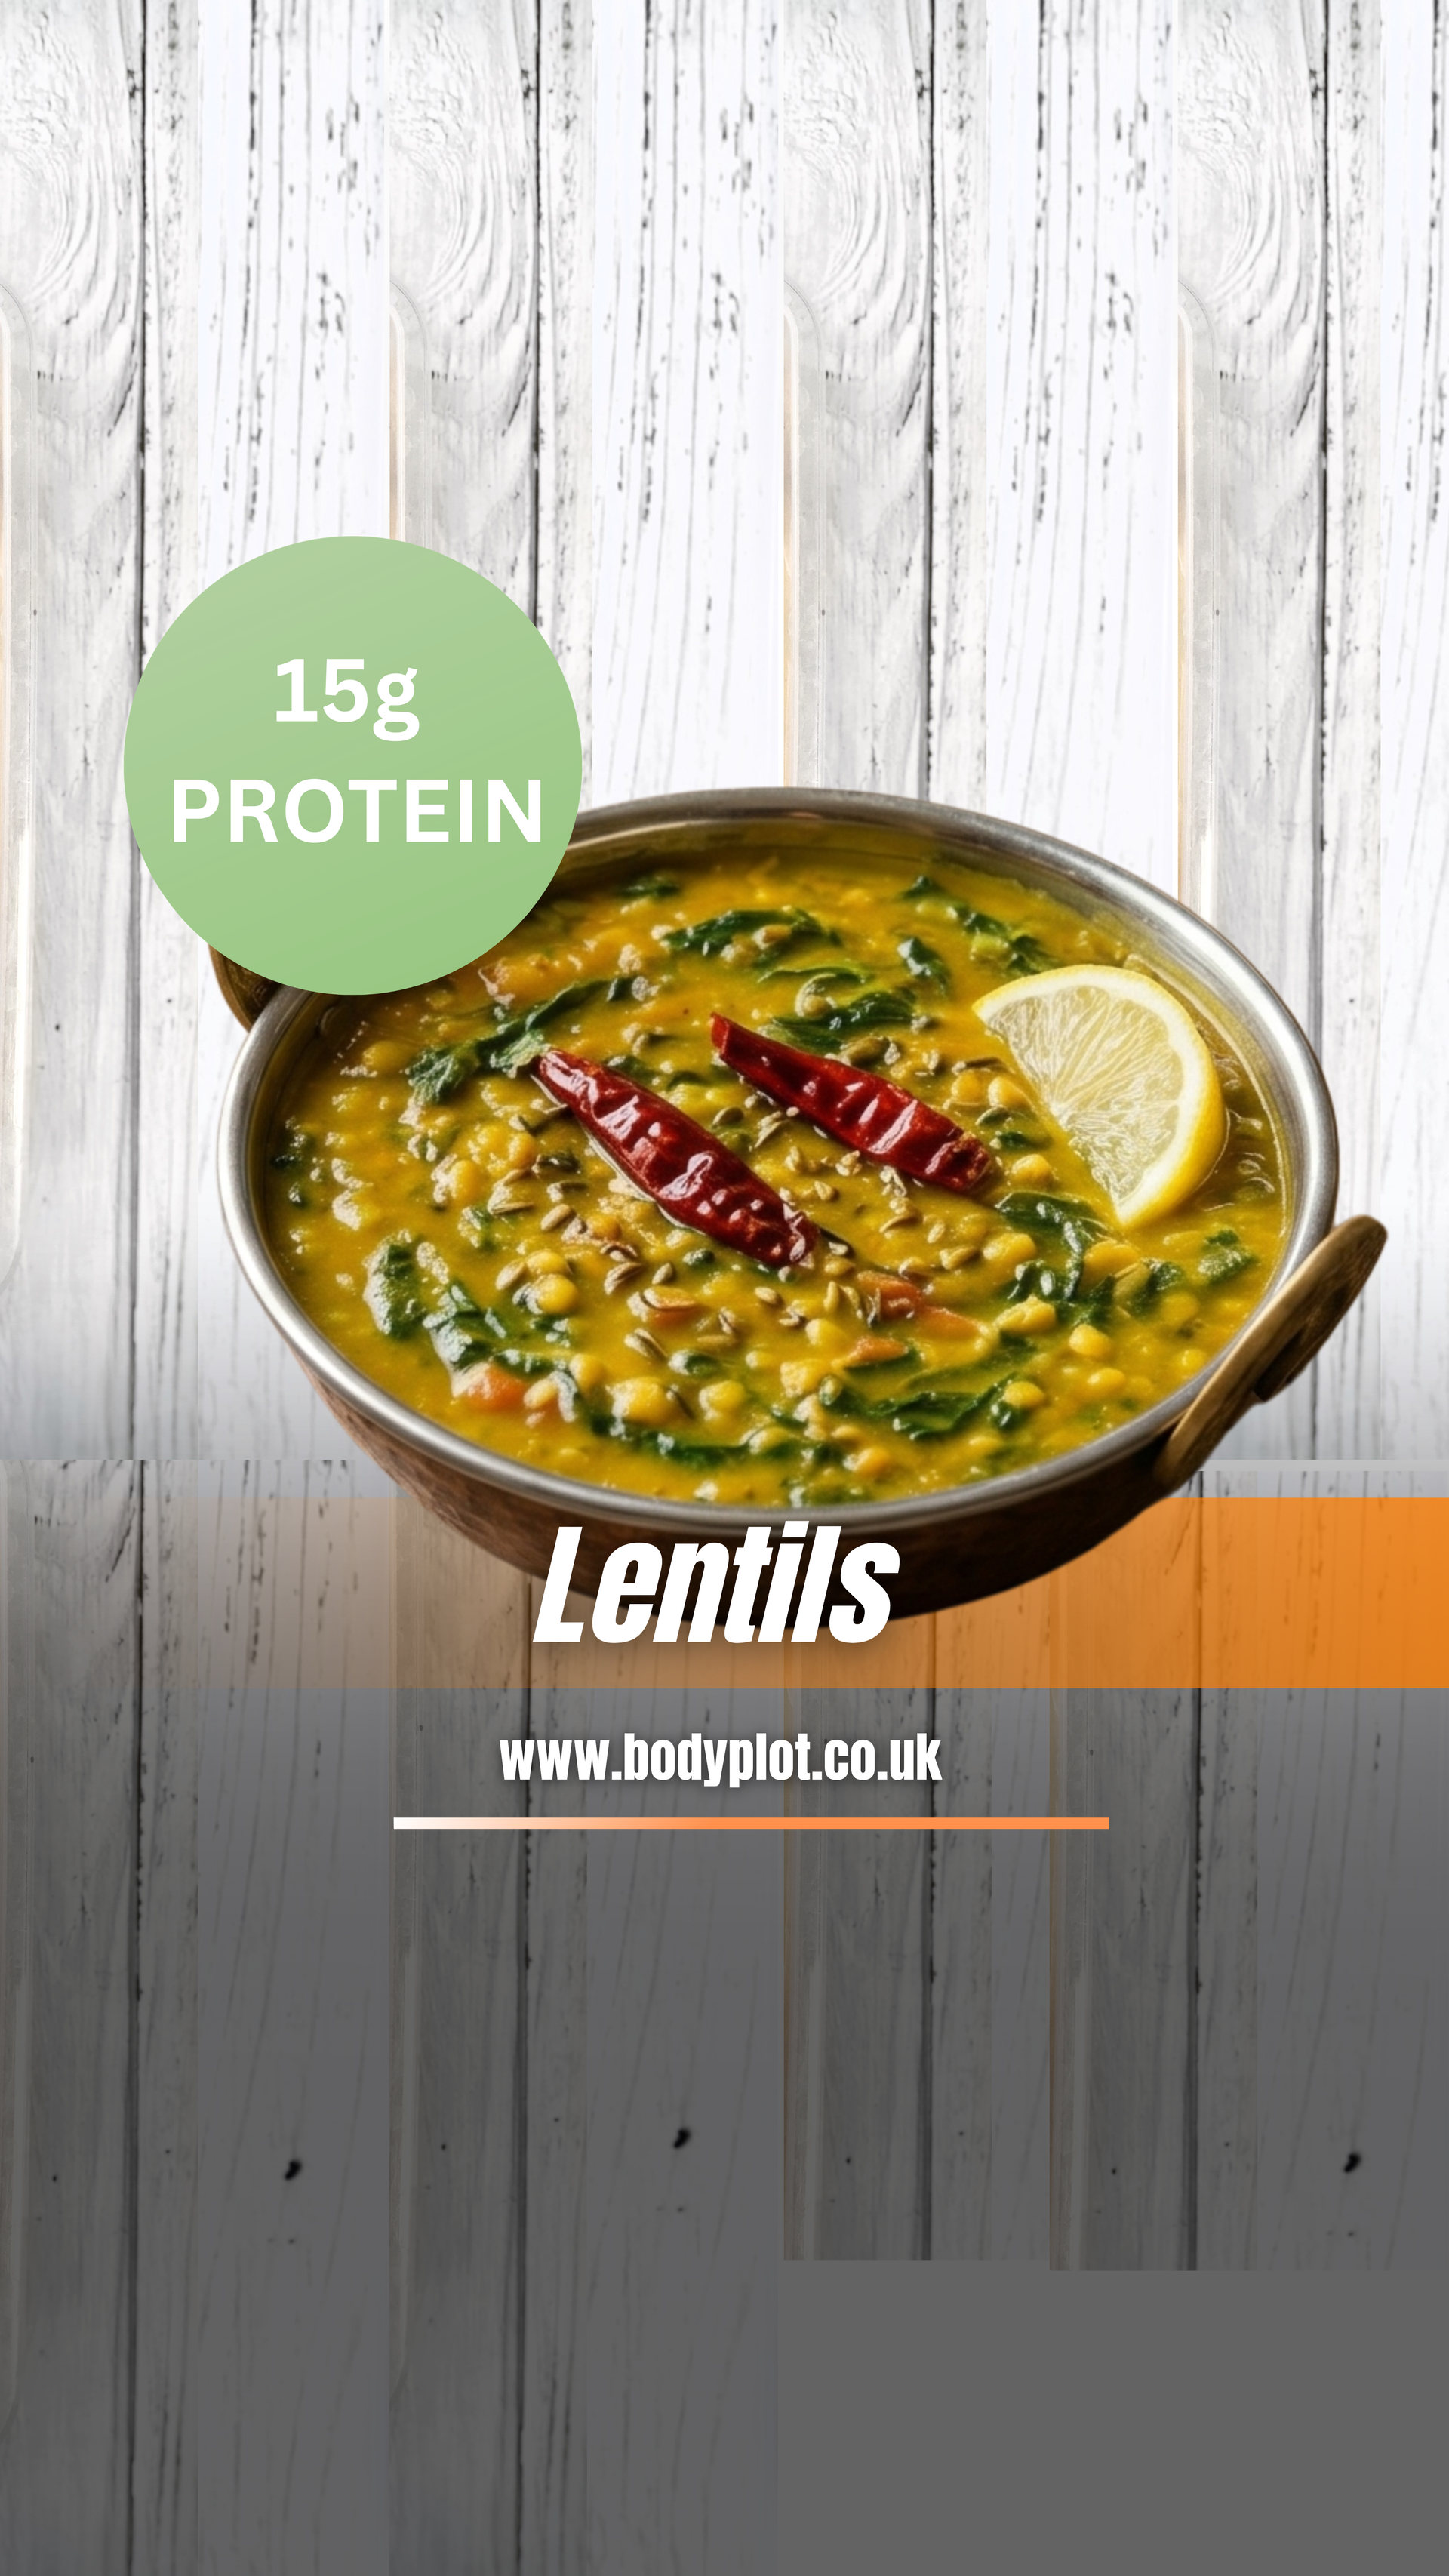
Quinoa Khichadi Feeds 4–5 people Ingredients 812 g cooked quinoa 120 g yellow moong dal (about ⅔ cup), rinsed 2 tbsp ghee or olive oil 1½ tsp cumin seeds 1 tsp mustard seeds (optional) 2 tsp grated ginger 1–2 green chillies, finely chopped (optional) ½ tsp turmeric 1 tsp ground coriander 1 tsp ground cumin 2 medium carrots (about 200 g), diced 150 g peas 1 medium courgette (about 180 g), diced (optional) 1.2–1.5 litres water (adjust for texture) Salt to taste Fresh coriander to garnish Lemon wedges to serve Optional tempering 2 tsp ghee 1 tsp cumin seeds Pinch hing 6–8 curry leaves Method (with quantities included) Add 120 g rinsed moong dal and 500 ml water to a saucepan and simmer for 15–20 minutes until very soft. Heat 2 tbsp ghee or olive oil in a large pot. Add 1½ tsp cumin seeds and 1 tsp mustard seeds and let them crackle. Add 2 tsp grated ginger and 1–2 chopped green chillies and sauté for 30 seconds. Stir in ½ tsp turmeric, 1 tsp ground coriander and 1 tsp ground cumin and toast briefly. Add 200 g diced carrots, 150 g peas and 180 g diced courgette and cook for 3–4 minutes. Add the cooked moong dal, 812 g cooked quinoa, salt and 700 ml water. Stir well. Simmer for 8–10 minutes, adding more water until the khichadi is soft and spoonable. You may need up to another 500–800 ml depending on how thick you like it. Optional tempering: heat 2 tsp ghee, add 1 tsp cumin seeds, pinch hing and curry leaves, let splutter and pour over. Garnish with coriander and lemon juice before serving. Extra Body Plot Tips Add spinach at the end for iron and fibre Stir in tofu cubes for extra protein Serve with coconut yogurt and mango pickle Great for clients with gut issues, post-illness recovery, or reset weeks
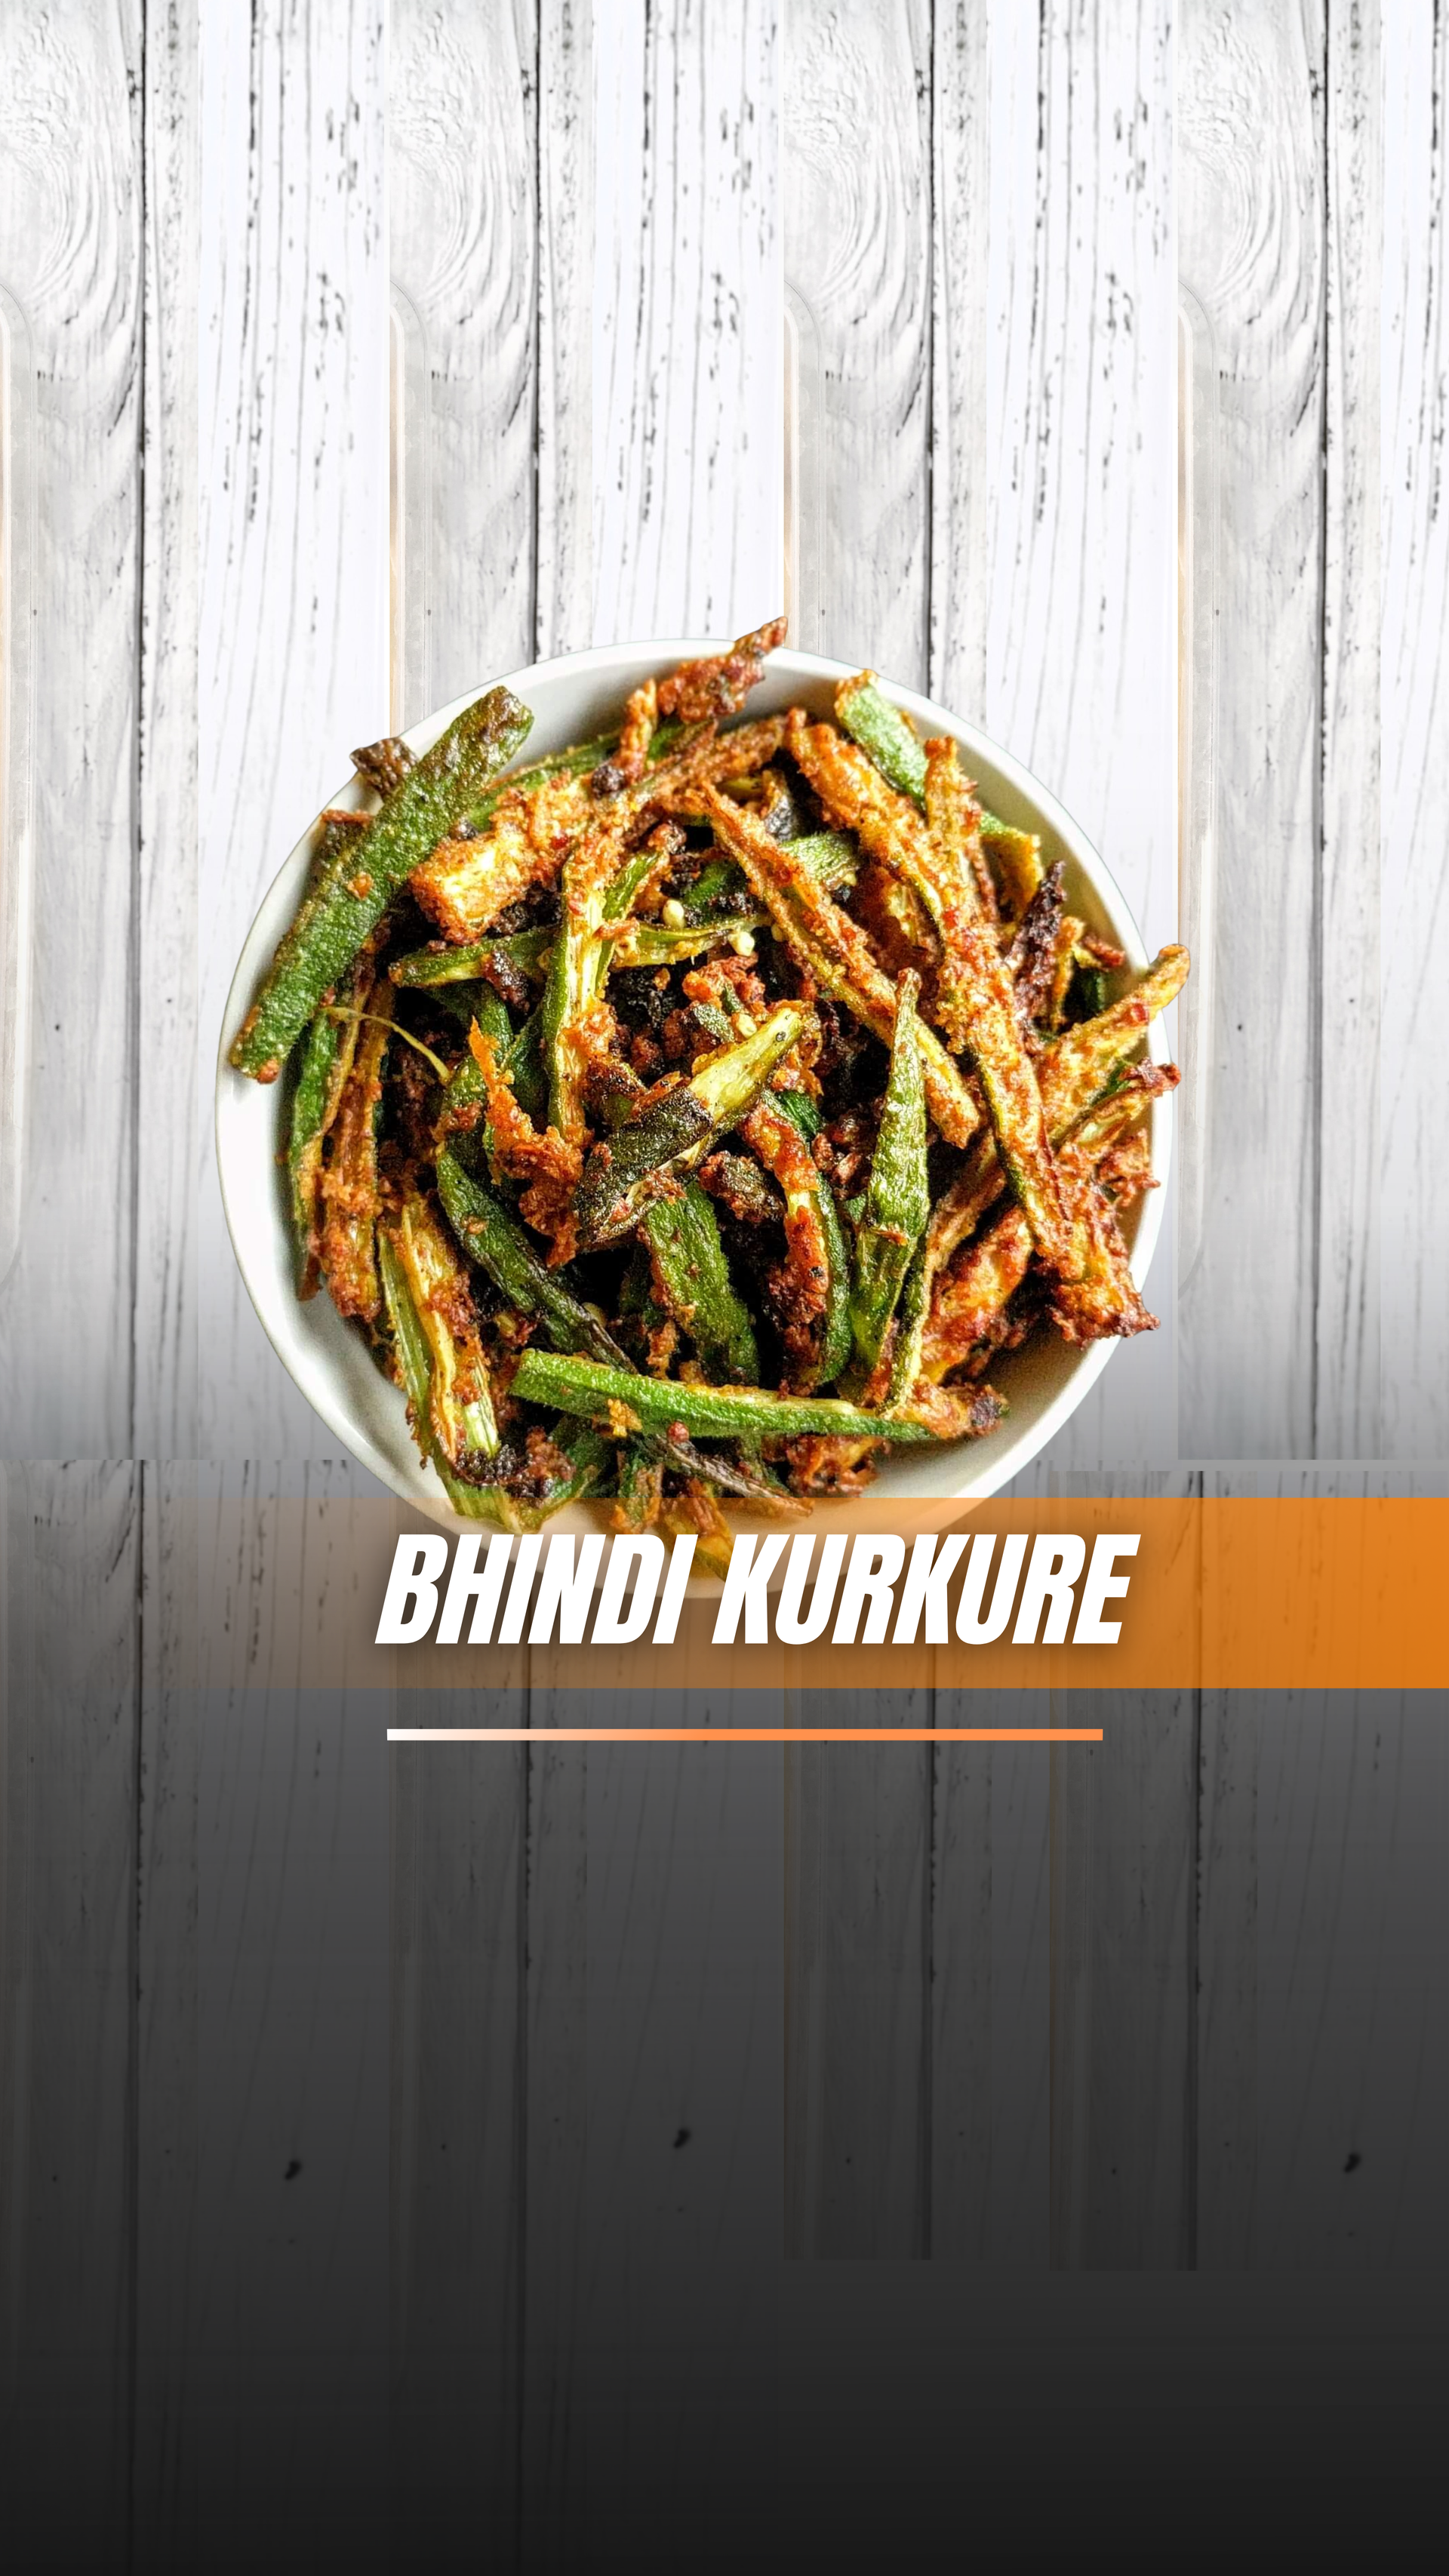
A lighter, oil-controlled version of restaurant-style kurkure bhindi. Perfect as a crunchy side, snack, or topping for dal bowls - and great addition for every household on Friday Fakeaway night! Serves : 6–8 as a side dish Ingredients 1kg fresh bhindi (okra) 120g gram flour (besan) 60g rice flour 40g cornflour 2 tsp turmeric powder 4 tsp red chilli powder 4 tsp coriander powder 2 tsp cumin powder 2 tsp amchur (dry mango powder) 2 tsp chaat masala 2 tsp ajwain (optional) 2½–3 tsp salt (to taste) 4 tbsp oil (about 60ml) Light oil spray for air fryer Optional finish: lemon juice + extra chaat masala Method Wash the bhindi and dry completely. Moisture makes it slimy and prevents crisping. Slice lengthwise into thin strips. The thinner the slices, the crispier the result. Place bhindi in a large bowl. Add oil and salt and toss well. Add besan, rice flour, cornflour and all spices. Mix gently using your hands so each strip is lightly coated. The coating should be thin, not thick like pakoras. If mixture looks too dry, sprinkle 1–2 tbsp water. If too sticky, add 1 tbsp rice flour. Air Fryer Cooking Preheat air fryer to 180°C. Spread bhindi in a single layer (cook in batches if needed). Spray lightly with oil. Air fry 14–18 minutes, shaking halfway. Cook until deep golden and crisp. For extra crunch: cook 12 minutes, rest 5 minutes, cook another 3–4 minutes. To Serve Sprinkle chaat masala and squeeze fresh lemon juice. Serve with dal, yoghurt dip, wraps, or as a crunchy topping on salads. Storage Cool completely before storing. Keep in airtight container up to 2 days. Reheat in air fryer 3–4 minutes to crisp again. Body Plot benefits: High fibre and lower oil than traditional frying. Add crushed flaxseed or hemp seeds for extra protein. Pair with dal + salad for a balanced menopause-friendly meal and diabetes friendly meal with stable energy.
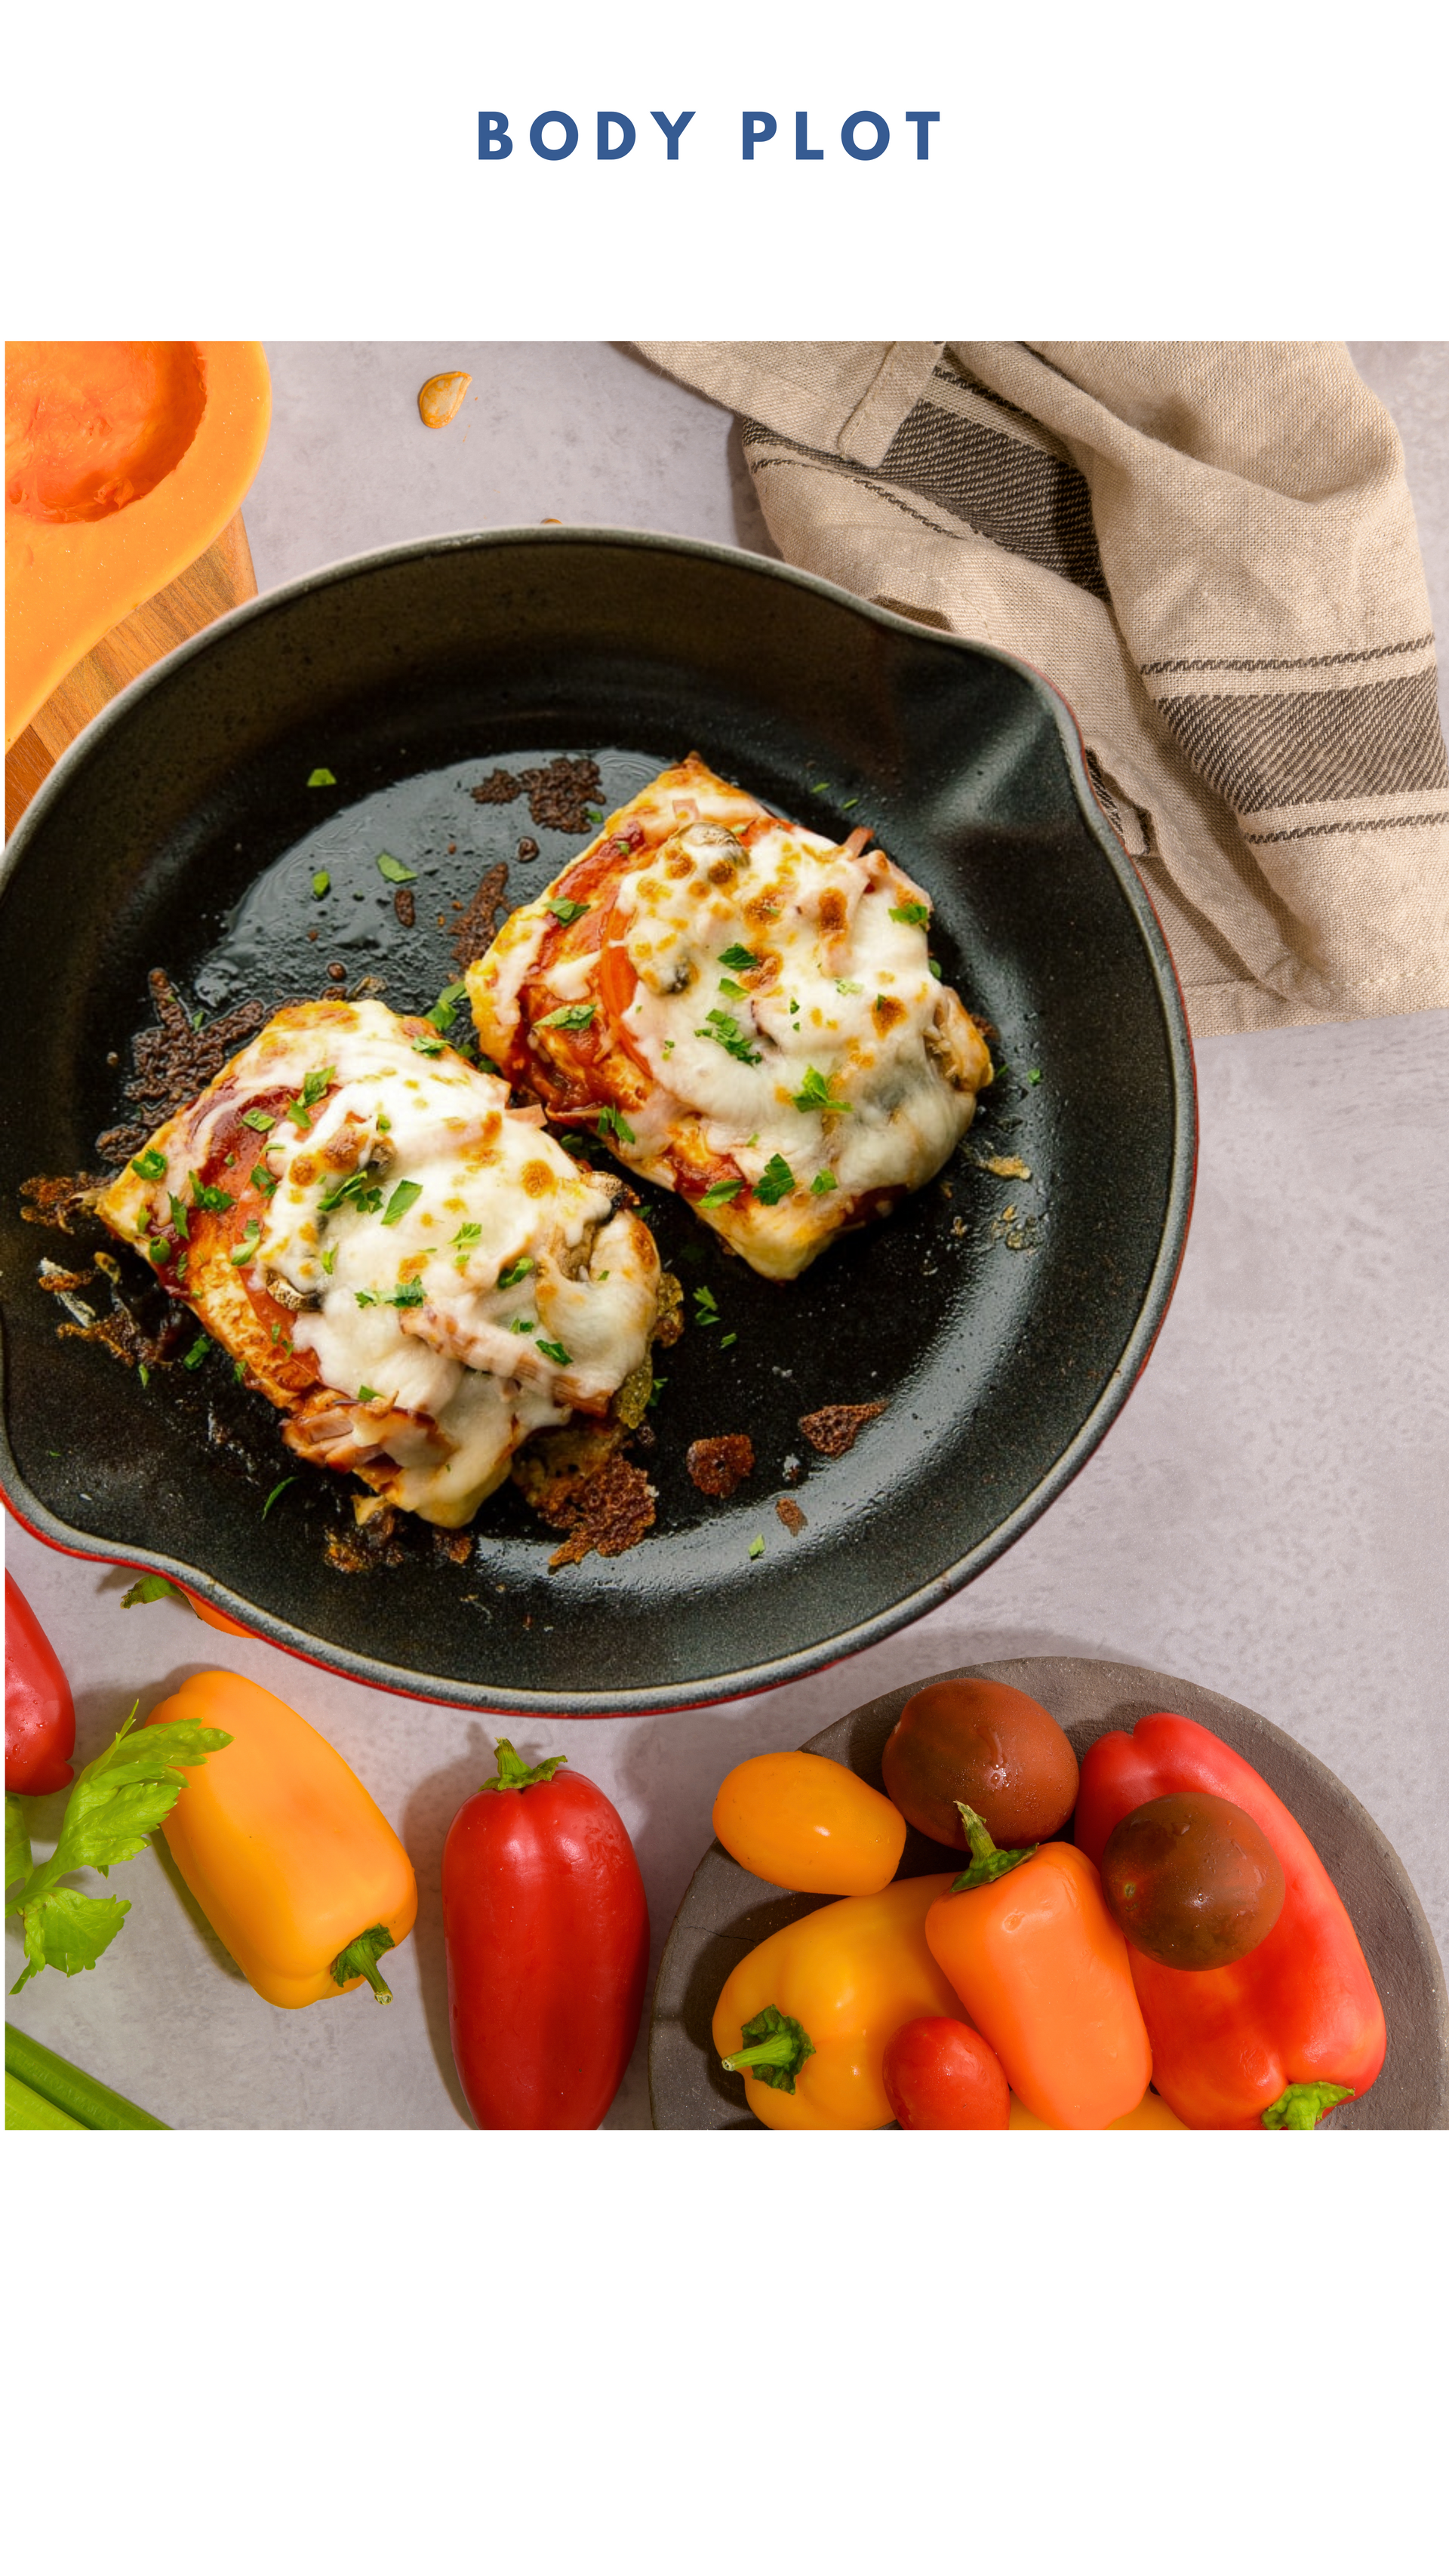
This recipe is such a delicious and nutritious take on pizza! If you've not enjoyed tofu previously, this recipe will change your opinion. Want to have your cake and eat it too? Try: have your pizza and eat it too! Key benefits: - High in Protein - Plant-centric with over 8 vegetables in this one dish - Can be easily made Vegan - Great for lowering cholesterol - Great for menopausal women Ingredients: - 1 block of Tofu [we used basil tofu] - Homemade or store bought tomato sauce - Protein cheese [Eat Lean or LIDL high protein] or Vegan Mozzarella - Vegetables of choice, we used: Aubergines, courgettes, sweetcorn, tomatoes, mushrooms, onions & red peppers - Lower in fat pesto Method: Drain tofu according to instructions on the pack. Cut tofu lengthways - this should result in approximately 3-4 tofu bases. Add these to a oil brushed air fryer or oven and bake at 190 degrees for 12 minutes, turning halfway. Finely dice the vegetables. Top with sauce, vegetables, cheese and pesto and add back into the air fryer or oven for a further 5 minutes until melted. Serve with a side salad and enjoy!